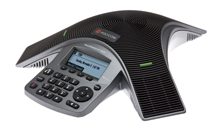
The Polycom Soundstation IP 5000 is a small desktop conference phone. It uses 100Mb Ethernet connectivity, which is not a limiting factor here as it only supports Voice and has no Video or PC pass-through functionality. It is powered by PoE (802.3af).
Soundstation IP 5000 Setup
Connect the Polycom to your network according to the instructions included with the device. When the IP address is discovered, enter it in the address bar of a web browser.
INFO: While the phone can be setup manually from the device, this article will only use the phone interface to obtain its IP address and the rest of the configuration referenced will be done via the web page.
NOTE: From the device, press the Menu button, use the navigate pad to select '2 Status', Select '2 Network', Select '1 TCP/IP Parameters', and the screen should show you the currently assigned DHCP address.
With the proper IP, enter it in a web browser using https, accept the risk to continue (it's a self-generated certificate) and login as Admin; default PW is 456, which can be changed or you may be prompted to change on login depending on phone FW installed.
- Digitmap Configuration: Choose Settings on the toolbar and select SIP in the left pane. Expand Local Settings.
- The Digitmap helps define how the device interacts with the digits pressed by the users. Inaccurate dial plans may cause lengthy dial delays or even failed / blocked calls. The reference plans below should work for most use cases.
- For 3 digit extensions:
- 9[2-9]xxxxxxxxx|91[2-9]xxxxxxxxx|011[2-9]x.T|[1234678]xx|51[45]7xx*[x*].*|512[0-9][0-9][0-9]|510|511[1-7]xxx|50[24]|501[1-4]x.*|516[1-5][1-5][0-3]x.*|517[1-5]*|911
- For 4 digit extensions:
- 9[2-9]xxxxxxxxx|91[2-9]xxxxxxxxx|011[2-9]x.T|[12]xxx|[34678]xx|51[45]7xx*[x*].*|512[0-9][0-9][0-9]|510|511[1-7]xxx|50[24]|501[1-4]x.*|516[1-5][1-5][0-3]x.*|517[1-5]*|911
- For 5 digit extensions:
- 9[2-9]xxxxxxxxx|91[2-9]xxxxxxxxx|011[2-9]x.T|[12]xxxx|[34678]xx|51[45]7xx*[x*].*|512[0-9][0-9][0-9]|510|511[1-7]xxx|50[24]|501[1-4]x.*|516[1-5][1-5][0-3]x.*|517[1-5]*|911
- Digitmap Timeout: This field typically has an indicated inter-digit timer per rule in the Digitmap above. These timers, as the rules above in the digitmap, are separated by pipe symbols i.e. the | generated when pressing shift + backslash. The dial plans above have 14 rules, so the timeout show be 3|3|3|3|3|3|3|3|3|3|3|3|3|3
- For 3 digit extensions:
- Line Configuration: Choose Settings on the toolbar, select Lines in the left pane, and click Line.
Expand Identification and enter:
- Display Name: Name that will be displayed to other users when called.
- Address: For the value to enter here, launch the iPECS Cloud Manager Console and choose User > User Setup. Select the user and scroll down to view the user's Device tab. The 'User ID' goes in this field.
- User ID: This is the 'Authentication ID' shown in the Device tab screenshot above and can be alphanumeric. If installing multiple phones, you may wish to use the same Auth ID for those devices.
- Password: This is the 'Authentication Password' shown in the Device tab screenshot above.
- Note the password field is currently limited to 10 characters.
- Label: Name that will be displayed on the phone's LCD.
Expand Server 1 and enter:
- Address: 66.171.194.10
- Port: 5060
- Register: Yes


